Parapet coping fixing details
How a Taylormade coping goes on a parapet wall. Two standard details, adhesive bonded and concealed mechanical fixing, each shown on three wall types. The details show how our coping fits. Fire stopping, cavity closers and the rest of the wall build-up are for the architect to confirm.
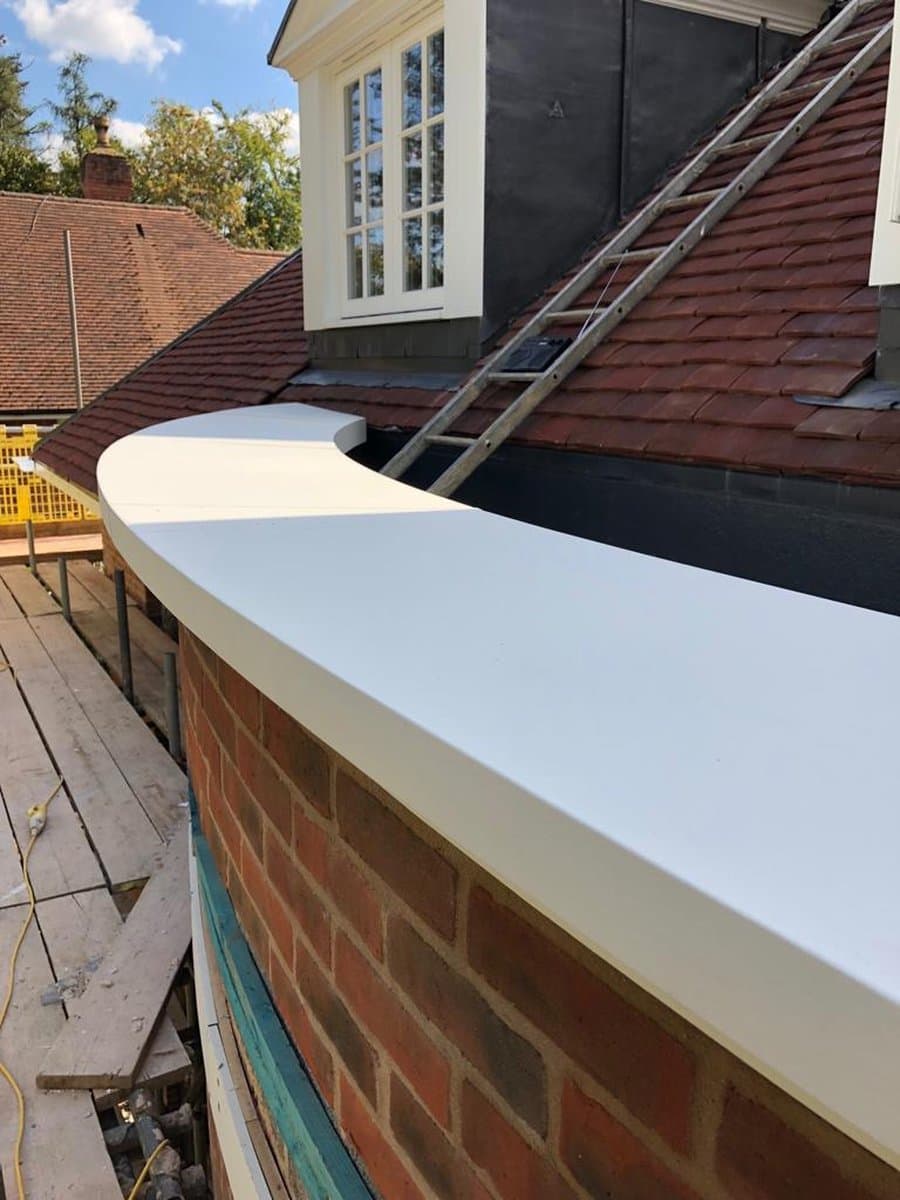
Parapet coping, adhesive bonded
The coping has a 40mm recess in its underside, so it sits down over the wall head. It is bedded on three strips: two adhesive strips with a strip of Insta-Stik foam between them for quick secondary fixing. Below the bed go a liquid membrane, a 9mm cement board and a DPC. Choose a wall type to see its section.
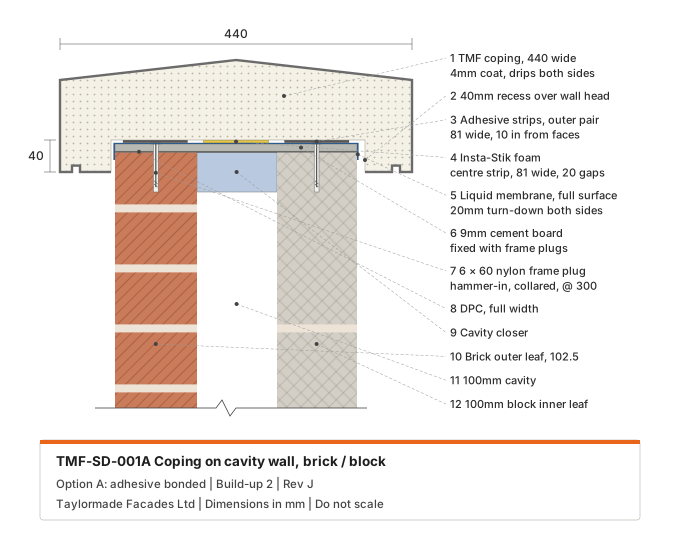
Scroll sideways, or tap the drawing to open it full size.
| Wall type | Wall width | Overhang each side |
|---|---|---|
| 1 Brick, 50mm cavity, timber frame | 314mm | 63mm |
| 2 Brick, 100mm cavity, 100mm block | 302.5mm | 68.8mm |
| 3 Rendered 100mm block, 100mm cavity, 100mm block | 300mm plus render | 70mm |
Parapet coping, mechanical fixing
Mechanical fixing is rarely needed and is reviewed at design stage, but it can be supplied on any coping if the architect asks for it. Where it is used, a galvanised steel dovetail rail is fixed into the underside of each coping and screwed through to the wall at each joint. The rail sits fully embedded in the coping and cannot be seen from outside. The 3-strip adhesive bed stays in place.
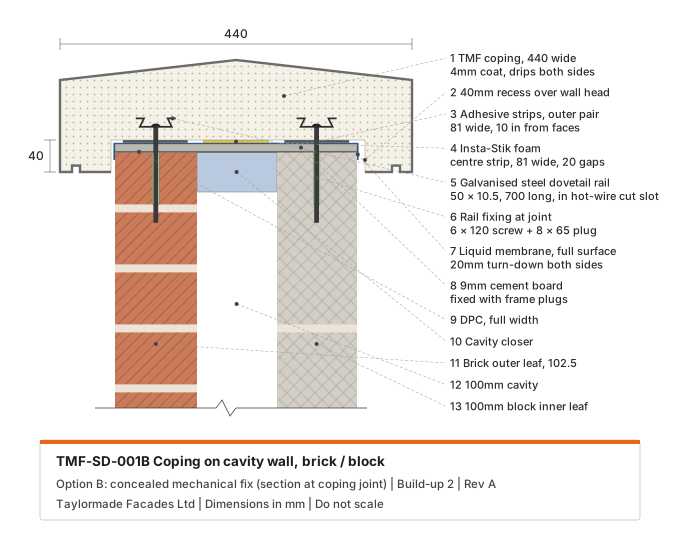
Scroll sideways, or tap the drawing to open it full size.
| Wall type | Wall width | Overhang each side |
|---|---|---|
| 1 Brick, 50mm cavity, timber frame | 314mm | 63mm |
| 2 Brick, 100mm cavity, 100mm block | 302.5mm | 68.8mm |
| 3 Rendered 100mm block, 100mm cavity, 100mm block | 300mm plus render | 70mm |
Fitting at each joint
Bed the first coping
The rails slide half into their slots and the coping is bedded on the 3-strip bed.
Fix at the joint
Screw through the rail into the plug in the wall. On timber frame, screw straight into the head plate.
Slide the next coping on
The next coping closes onto the other half of each rail.
What is supplied
Liquid membrane, cement board and fixings are supplied by Taylormade Facades where required, or by others as agreed.
Joint widths and jointing materials vary from project to project and are set by the architect. The model and sections show design intent only. Fixing centres, adhesive coverage and the interface with the rest of the wall are confirmed on the approved project drawing.
Send us your parapet details and we will confirm the coping and the fixing for your wall. Drawings back in 5–10 working days, depending on project complexity. See also how all our profiles are fixed and our parapet cappings.
Get a Quote for Your Project
Send us your drawings and we will come back with a coordinated profile proposal.
Request a Quote